It is sometimes a tough call to decide on how to finish an old bicycle frame. You can choose almost any kind of treatment from a “rat bike” to a museum quality finish and get a satisfying result within that theme. In general I usually prefer to keep things as original as I can and to be honest I don’t mind quite a bit of authentic patina, but this one was going to be different.
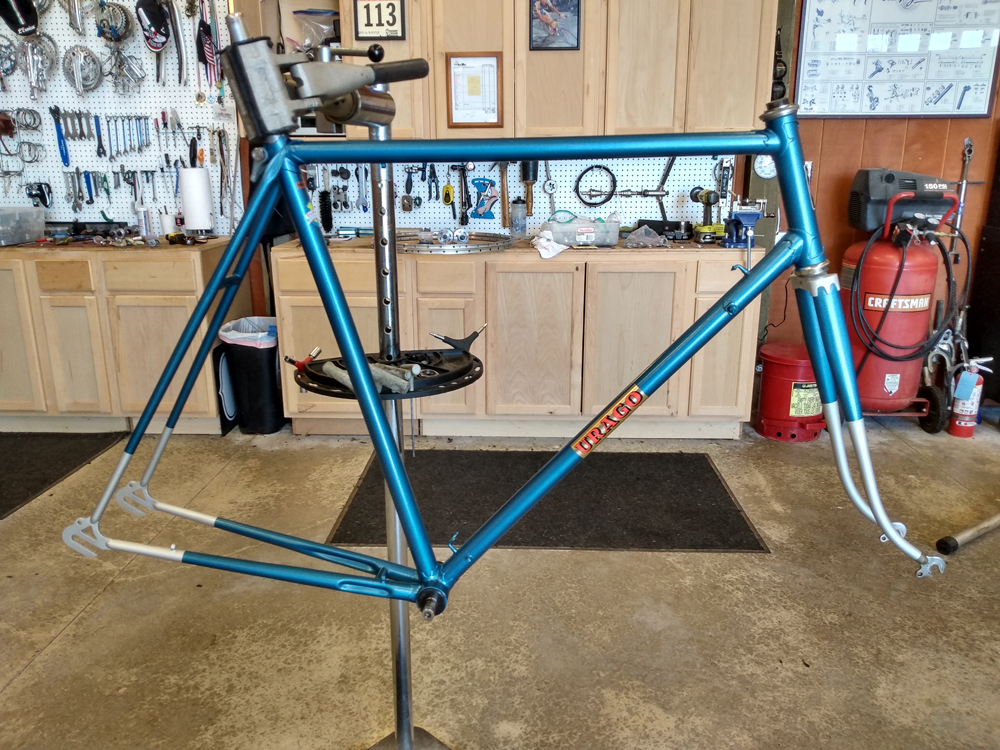
In the case of this frame a prior owner used brushed on paint to cover small chips in the finish which could have led to rust, and although the frame was preserved it looked pretty bad due to the mismatched colors. Sanding over these spots and chips with a 400 grit wet paper smoothed the surface but left large blemishes in the finish as paint layers were removed. There was also a dent in the seat tube that I would repair with body filler. Despite these flaws it should be a good surface for new paint to adhere to.

I chose not to remove the original finish and after sanding down any roughness and chips in the existing paint I was able to get what appeared to be a good paint-able surface. Using automotive paint from Napa Auto I laid down a coat of etching primer over everything. The chrome on the socks and fork crown was not salvageable so those got primed too. I was able to leave a little chrome on the the fork tips but that’s all that could really be salvaged.


Next was up was applying the blue color coat which went on nicely, and even though it covered really well I did two coats. Then after some measuring, I masked off a few areas for some silver trim. The fork socks, crown and the rear dropouts all got this treatment.
After curing for a day I took a fine abrasive to the painted surface to clean up any minor irregularities in the paint and then gave it a layer of clear coat. I have read that decals lay better when applied over a single layer of clear and then when in place they were clear coated again. Two more coats of a satin finish clear were then applied to the frame to complete the job.


Overall the resulting finish looks good but not great. There were some irregularities around the lugs and some scratches in the underlying surface that are apparent. Also, the clear coat had a bit of an orange peel look to it in places. I knew that I could have sanded down the clear coat a little bit but I got nervous about sanding over the decals and decided to leave well enough alone.

The spray gun I used was an inexpensive $30 unit from Harbor Freight. It has a 4 ounce cup which holds enough paint to do a complete coat on a frame and fork. It is easy to use and has some adjust-ability for pressure and paint flow. The learning curve is no too steep to getting a good finish, but getting a great result will take a bit more practice.

The end goal for this bike is to be a clean and functional rider, and not a show piece or wall hanger. In my experience museum quality bikes will rarely get used, they just look too nice to be regular riders. I do have several examples of pristine bikes and they are beautiful, but never get ridden. These are special in some way that sets them apart, such as a new old stock Hetchins frame, a Joe Bell painted unit or a limited edition Battaglin Marosticana. Most of my bikes though are “riders” and get used as frequently as opportunity allows.
Previous post on this bike here.

February 13, 2023 at 1:12 pm
Love your blog! Any chance you’d like to feature an 82′ Trek 650b conversion build? I have plenty of photos and I also made a video about it – https://youtu.be/UiJw0uifm8g
September 5, 2022 at 11:50 pm
Looks like a respectable job for a bike that will be ridden. Did you think about applying a coat of regular primer over the etching primer (and then rubbing down before the color coats)?
September 6, 2022 at 2:11 pm
Andrew,
Thanks for the comment! I think that I will try the additional primer coat next time. It should help me get a better finish in the end, as in another layer to wet sand. I’m just learning the ins and outs as I go! No doubt I can do better next time!
September 5, 2022 at 11:16 pm
Bravo on a respectable refresh on bringing this fine Urago back onto the asphalt! This was a perfect frame to test out your aerosol skills yet go above the world of rattle can.
Paint is clearly an art and skill unto itself but I’m curious if this test has your interest piqued for more frame painting projects or if it was more of a one-off?
September 6, 2022 at 1:59 pm
Josh,
I’ve got another one almost ready to paint. It is a 1971 Lygie that I acquired from a Bike Forums member. It is also a lower tier model but it’s chrome is in better shape. I’ll be doing it in a two tone silver and blue also and will keep all the existing chrome, including the head lugs. If I get that done with any improvement then I will consider one more, a 1947 Stallard which I want to turn out nicely!
September 6, 2022 at 2:47 pm
You better be careful. If you keep improving, I’m going to come to you for a few paint projects! 😉